
Exploring Caen Tile RFID Settings
This article discusses how to change various settings on the Caen Tile RFID Reader.
Changing the mode of CAEN Tile RFID reader from HID keyboard emulate mode to EASY2READ mode.
Important Note : The reader is sold with the factory default profile set to EASY2READ.
The Tile R1250I reader is connected to a PC using Y USB cable and it is detected by the PC as an emulated serial port. In order to correctly work with the reader you need to install the CAEN RFID driver.
- Reader is not getting connected with RFID software like TagMatiks AT Lite or CAEN RFID Easy Controller software even after installing all device drivers.
- When connected with laptop / desktop and in proximity of RFID tags, reader is reading hexadecimal string on Notepad or other simple text editor software.
Steps to change mode to EASY2READ mode :
Install a serial terminal compatible with VT100 (e.g. Hyperterminal or Teraterm).
Link to download the Teraterm is https://tera-term.en.lo4d.com/download/mirror-ls1.
Make sure that the Y USB cable provided with the reader is correctly plugged into the PC.
Make sure that you have Installed the required CAEN RFID USB driver.
Open Hyperterminal or Teraterm software
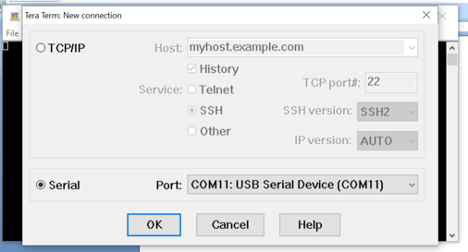
Your computer may automatically detect reader and open this window, if not Click on File-> New Connection and look for the USB Serial Device Config Port ( example COM10 or COM11) and select it ->OK.
If dropdown menu is showing two ports and if reader is not connecting on first available port, please select second available port. Refer the screenshot below
Press the “ESC” key to access the reader configuration menu.
Your computer screen should look something the screenshot below

The Tile R1250I menu options are the following:
- Active profile
- Startup RF Power
- HID Keyboard
- HID format
- HID scan delay
To scroll through the main menu press the arrow keys, to change the listbox values press the “-“ or “+” keys and to exit and save press “ESC”.
The reader is sold with the factory profile set to EASY2READ.
To activate a different profile, press the right arrow to select the EASY2READ profile (factory profile), then use the “-“ or “+“ keys until the desired profile is displayed (EASY2READ or HID).
Press the ESC key to exit from the configuration interface and to save the new setting.
The display shows the message "Configuration Saved" to inform you that the new settings is active.
Your reader is now ready to be connected to RFID software like TagMatiks AT Lite
Changing the mode of CAEN Tile RFID reader from EASY2READ mode to HID keyboard emulate mode.
Steps to change mode to HID keyboard emulate mode :
Install a serial terminal compatible with VT100 (e.g. Hyperterminal or Teraterm).
Link to download the Teraterm is https://tera-term.en.lo4d.com/download/mirror-ls1.
Make sure that the Y USB cable provided with the reader is correctly plugged into the PC.
Make sure that you have Installed the required CAEN RFID USB driver.
Open Hyperterminal or Teraterm software
Your computer may automatically detect reader and open this window , if not Click on File-> New Connection and look for the USB Serial Device Config Port ( example COM10 or COM11) and select it ->OK.
If dropdown menu is showing two ports and if reader is not connecting on first available port, please select second available port.
Press the “ESC” key to access the reader configuration menu, please do not forget this step.
Your computer screen will look as shown below.

The Tile R1250I menu options are the following:
- Active profile
- Startup RF Power
- HID Keyboard
- HID format
- HID scan delay
To scroll through the main menu press the arrow keys, to change the listbox values press the “-“ or “+” keys and to exit and save press “ESC”.
Remember the reader is sold with the factory profile set to EASY2READ.
To activate a different profile, press the right arrow to select the HID profile, then use the “-“ or “+“ keys until the desired profile is displayed.
Press the ESC key to exit from the configuration interface and to save the new setting.
The display shows the message "Configuration Saved" to inform you that the new settings is active.
Your device mode is now changed to HID mode.
Exploring other configuration menu options i.e. Startup RF Power, HID Keyboard, HID format and HID scan delay.
In this section let us explore other menu options of the configuration menu.
Startup RF Power
RF Power or Reader transmit power/output power is the amount of power transmitted by the RFID antenna.
For CAEN Tile model RF power is measured in milliWatts (mW). The reader is sold with the factory Startup RF Power set to 200mW. The Startup RF power value can be changed in the range 0-500.
To set a different RF value, press the down arrow and then the right arrow to select the Startup RF Power value. Using
the “backspace” key, delete the current value and insert the desired power value in the range 0-500. All values are
expressed in mW. Please refer to the screenshot below

Press the ESC key to exit from the configuration interface and to save the new setting.
The display shows the message "Configuration Saved" to inform you that the new settings is active.
HID Keyboard
HID Keyboard can be used with any software application where the scanner will be used for entering data where normally the keyboard would be used. The scanner emulates a keyboard, and therefore needs to be set-up to match the keyboard physically connected to the Host. By default the scanner is set-up to send data for QWERTY, so for countries using a different keyboard layout that needs to be changed.
The HID Keyboard options are the following:
QWERTY: standard keyboard.
AZERTY: French keyboard
The reader is sold with the factory HID keyboard set to QWERTY.
To set a different keyboard, press the down arrow until “HID Keyboard” is displayed and then the right arrow to select
the QWERTY option; use the “-“ or “+“ keys to shift between QWERTY and AZERTY. Please refer to the screenshot below

Press the ESC key to exit from the configuration interface and to save the new setting.
The display shows the message "Configuration Saved" to inform you that the new settings is active.
HID format
If you have selected HID profile as Active Profile you can set different EPC format by using HID format options.
If you are using EASY2READ profile as Active Profile it is not possible to change the HEXADECIMAL EPC format.
Access the configuration menu:
Use the arrow keys to scroll through the main menu.
The HID format is the fourth option of the main menu.
The HID format options are the following:
- HEXADECIMAL: The RFID EPC is represented by hexadecimal digits
- ASCII: The RFID EPC is represented by ASCII characters
- SGTIN14: This is a special option, you need to contact our team for more information.
The reader is sold with the factory HID format set to HEXADECIMAL.
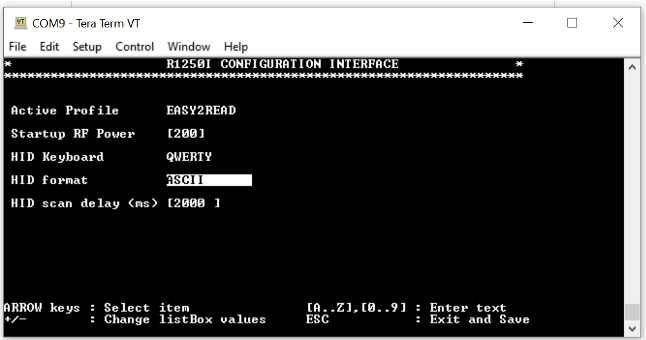
To set a different format, press the down arrow until “HID format” is displayed and then the right arrow to select the
HEXADECIMAL option (factory format); use the “-“ or “+“ keys to select the desired format. Please refer Pic 8.0 below.
Press the ESC key to exit from the configuration interface and save the new setting.
The display shows the message "Configuration Saved" to inform you that the new settings is active.
HID scan delay
The HID scan delay represents the delay between a scan and the next scan. It’s measured in milli seconds (ms) and you can input any value between 0-99999.
Access the configuration menu as explained in the Reader Configuration Menu paragraph page 17.
Use the arrow keys to scroll through the main menu.
The reader is sold with the factory scan delay set to 500ms.
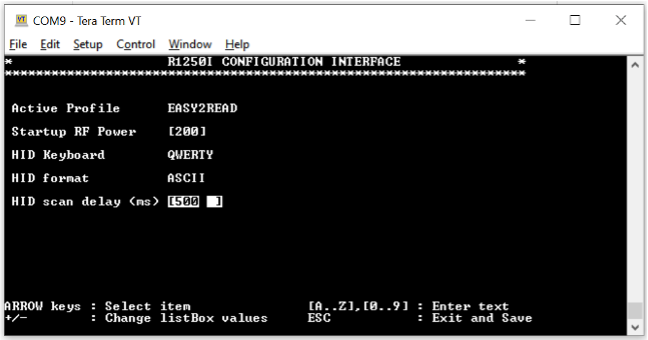
To set a different HID scan delay, press the down arrow until “HID scan delay” is displayed and then the right arrow to
select the current value. Using the “backspace” key, delete the current value and insert the desired scan delay in the range 0-99999. All values are expressed in ms. Please refer to the screenshot below
Press the ESC key to exit from the configuration interface and to save the new setting.
The display shows the message "Configuration Saved" to inform you that the new settings is active.
Recent Posts
-

What to Consider as a Retailer When Choosing RFID Label
Radio Frequency Identification (RFID) has become a cornerstone of modern retail operations. From inv …Jul 14th 2025 -

Best RFID Tags for Metal Environments: Types & Applications
Radio Frequency Identification (RFID) technology is revolutionizing asset tracking, inventory manage …Jul 10th 2025 -

Stages of RFID Seal Tags: From Manufacturing to Application
Radio Frequency Identification (RFID) technology has revolutionized supply chain management, asset t …Jun 30th 2025